Mastering Essential Git Commands for Version Control | GitHub Basic
Git commands allow developers to track changes to any set of files. They were initially meant for improving coordination among developers who were trying to run source code while implementing and testing code.


Learn crucial Git commands for efficient version control on GitHub. Explore Git init, clone, branch, add, commit, status, push, fetch, merge, and pull in this comprehensive guide.
Version control (also known as source control) is essential in the development of any project on GitHub. It is the process of tracking and controlling changes made to the source code. And, since Git is one of the most commonly used tools in version control, it is essential to learn some of the most common Git commands.
Git commands allow developers to track changes to any set of files. They were initially meant for improving coordination among developers who were trying to run source code while implementing and testing code.
In this article, we will explain 10 useful GitHub commands every developer should master.
Git init: The git init command initiates the creation of a new Git repository. It can be used to convert an unversioned project to a Git repository or to create a new, empty repository.
Because most other Git commands are inaccessible outside of an initialised repository, this is typically the first command developers run in a new project.
Some of the common ways the clone command can be used on GitHub are as follows:
- git init: Transforms any repository into a git repository. This command adds a “.git” extension to the repository which makes it possible to add revisions to it.
- git init [directory]: This command creates an empty Git repository in the specified directory.
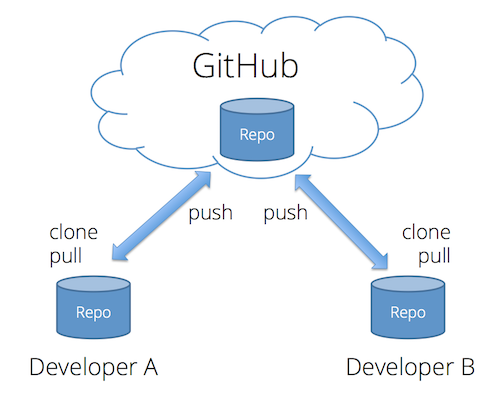
Git clone: The clone command on GitHub enables any developer to create a local copy of a repository remotely. Once someone clones a repository they get all the files, branches, and commits associated with it.
The remote repository’s URL is called the “origin”. Once the local copy of the repository is created, developers can then make changes to the repository.

A repository can be cloned only at the beginning of the interaction of the project. One of the major advantages associated with cloning a repository on GitHub is the ability to work on it freely.
Consider a case of two people A and B working together to publish a book. A is responsible for writing the book while B on the other hand handles the editing operations and keeps an e-copy of the book.
Cloning in this situation will be the process of printing the book to have a hard copy so that work can be done at home. Cloning a GitHub repo is thus similar to downloading the project locally on the system in order to make changes to it.

Some of the common ways the clone command can be used on GitHub are as follows-
- git clone [URL]: Clones the entire content of the repository including its files, branches, and commits.
- git clone --mirror: Clones the entire repository but does not allow the editing of its associated files.
- git clone --single-branch: Clones a single branch of the repository.
Git branch: A branch on GitHub is the version of the repository that differs from the parent repository. Many version control systems employ the use of branch command to allow changes to be made parallelly on the code. A branch is created to summarize the changes made to the code.
Branches on a tree can serve as a very good analogy for the git branch command. Tree branches emanate from the tree’s trunk and they keep on growing with time while the trunk stays as it is. Similarly, a git branch originates from the primary branch called the main branch and acts as the source of development for the project. After a git branch is created, developers work on it to add a new feature to the project and all of this happens without affecting the master branch of the project.
The branch command allows developers to create, list, rename and delete branches from a piece of code.
Following are some of the operations that can be performed on a branch along with their syntax
- git branch: Lists out all the branches in the repository
- git branch [branch]: Creates a branch with the name “branch”.
- git branch -d [branch]: Deletes the specified branch if it has no unmerged changes.
- git branch -D [branch]: Deletes the specified branch even if it has unmerged changes.
Git add: Using the add command on GitHub, changes can be added to the staging area of the working directory. It indicates git about adding an update to a particular file anytime the next commit takes place. These changes do not take place instantaneously. They take place only when the commit command is run.
Consider a car that has been fully designed. The people who designed it then declare it fit enough to go through testing. The mere declaration of the car being fully out of the design process can be considered as the execution of the git add command while the car can currently be considered to be in the staging area.

Some of the common ways the clone command can be used on GitHub are as follows:
- git add [file]: Stage all changes in the file for the next commit.
- git add [directory]: Stage all changes in the directory for the next commit.
- git add -p: Start an interactive staging session in which you can select portions of a file to include in the next commit.
Git commit: The git commit command saves a snapshot of the current staged changes in the project. Committed snapshots are those versions of a project that Git will never change unless someone specifically asks them to.
Each commit contains the index data and the commit message. The addition of a file to a repository puts it in indexing which then moves forward to the repository using commit.
Each commit has its own commit id. The master branch contains details regarding every commit made. Commits can be recalled using the commit id and can also be reverted back to the older versions.
Git commits help in maintaining a detailed history of changes, making it easier to track the evolution of a project over time. A well-crafted commit message is essential for providing context and clarity about the changes made in a commit, aiding collaboration among team members.
Git commits allow developers to work on different features or bug fixes simultaneously by creating separate branches and merging them when ready. The commit id serves as a unique identifier for each commit and is crucial for referencing and managing changes in a Git repository.
Let us take up the example of shopping at a departmental store to explain git commit command. Sumit goes through the store and puts everything he needs in the shopping basket. He then goes to the checkout corner and puts the basket on the conveyor belt (git add). At the checkout counter, he makes the payment to take the basket home. This last set of actions that resulted in a transaction is synonymous with the git commit command.

Here are a few ways this command is used on GitHub:
- git commit: Commits the changes from the staged area to the repository.
- git commit -a: Commits a snapshot of all the changes in the working directory.
Git status: The status command gives the status of the working directory and the staging area. It provides complete information about the staged and unstaged changes. In addition to this Git status also shows the changed or new file in the repository.
The Git status command works similar to a construction site supervisor who ensures things keep moving and keeps a check on the status of the work being carried out.
By using git status, you can efficiently manage your workflow by identifying files that have been modified, staged, or remain untracked. It's a fundamental tool for staying organized and ensuring that your project proceeds smoothly.
This instruction serves as a vital tool, functioning as your project's vigilant observer, informing you about the status of files that are prepared for the subsequent commit and those that demand further attention.
Git push: To upload the commits made from the local repository to the remote repository, the push command is used.
Once the changes have been uploaded using the push command, it is accessible to other members who might be working on the project. It is recommended to use the pull command on the remote repository before pushing any changes since this will successfully update the local repository with any new changes that might have been earlier pushed to the remote repository by some other developer.
Consider a student, Anand appearing for an exam. Whenever Anand is done writing his answers, he submits the answer sheet to the invigilator. The moment Anand hands over his answer sheet to the invigilator can be considered analogous to the execution of the git push command.
Some of the common ways the clone command can be used on GitHub are as follows:
- git push [remote] [branch-name]: Push the specified branch, as well as all necessary commits and internal objects, to the remote repository.
- git push [remote] --force: With the use of “force” the push takes place even if it results in a non-fast-forward merge.
- git push [remote] --all: Pushes all of your local branches to the specified remote repository.
Git fetch: The fetch command downloads commits, files & refs from a remote repository to a local repository. This command is generally used when someone needs to look at what others have been working upon.
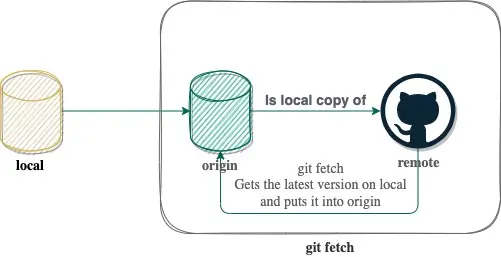
The git pull and git fetch commands accomplish the same task. The only problem is the git fetch command downloads the remote content but does not update the local repository. Hence, it is the more conservative of the two commands.
The git fetch command is synonymous with someone withdrawing money from a bank account but not taking it home.
Let’s revisit the example of the book being written by A and B used earlier while explaining git clone. A and B have been able to successfully complete the book they were working upon. Although B already has a soft copy of the book on his system he is completely unaware of it. He goes on to download it and on being prompted by the system, B decides to not replace the already existing copy of the book. And thus there are two copies of the book on his system- one updated and one old. This whole process of not updating the old version with the new one is similar to performing the git fetch command.
Here are a few ways this command is used on GitHub:
- git fetch [remote]: Fetches all the branches from the remote repository
- git fetch [remote] [branch]: Fetched a specified branch from the remote repository.
- git fetch --all: Fetches all the remote repositories that are registered and their branches.
Git merge: Git merge integrates various sequences of development made using the git branch and creates a single unique branch. In the majority of cases, git merge is used to merge two branches. While performing the merging operation, git finds out the common base commit between the two branches and then performs a new merge operation.
Consider Ankush working on a research project. Ankush would need to do research, and collect data, images, and graphs. Once Ankush has been able to successfully collect all of these, he would need to put all of them in a proper document to move it forward for submission. The whole process that would be carried out by Ankush to put everything in a properly documented format is very synonymous with the execution of the git merge command.
A few ways the git merge command can be deployed are as follows:
- git merge --no-ff <branch>: This line of code merges the specified branch into the main branch but always generates the merge commit.
- git merge --squash: Merges all the changes made into a single commit
- git merge --abort: Aborts the merging operation and restores the file to the older version.
Git pull: The git pull command is used to extract changes out of a repository on GitHub and update it to the local repository. This command is a combination of both the fetch and merge commands. The fetch command downloads content from a remote repository which is then updated into the repository using the merge command.

Software updates on smartphones are a great example of git pull. Google play remotely stores the updates for any new software. Android device users just need to open the app store and click on the update button to update their applications to their latest version. The mere act of clicking on the update button is similar to executing the pull command on GitHub.
Some of the common ways the pull command can be used on GitHub are as follows:
- git pull [remote]: This command will fetch a copy from the repository and then merge it into the local copy.
- git pull --no-commit [remote]: Here, the contents are fetched from the repository but are not merged.
While writing this article, these were a few interesting Git commands we came across. These commands can prove helpful for developers in increasing their productivity.
It is essential for developers to remember that there are numerous other git commands out there which could not feature in this list, and hence it is advised for developers to keep on looking out for more such commands and find out ways to boost productivity.
In summary, it is of utmost importance to acquire proficiency in fundamental Git commands to ensure efficient version control. When employing GitHub for version management, the initial action involves executing "git init" to establish a fresh Git repository, usually undertaken at the onset of a project. Subsequently, developers can employ "git clone" to generate local duplicates of distant repositories, enabling collaborative efforts.
"Git branch" is a useful command for parallel development, as it creates branches that summarize code changes. "Git add" stages changes for the next commit, while "git commit" saves snapshots of staged changes with unique identifiers. "Git status" provides insight into the working directory's current status.
To collaborate with others, developers can use "git push" to upload local commits to the remote repository. "Git fetch" downloads remote content, while "git merge" integrates branches. "Git pull" combines fetch and merge to update the local repository with remote changes. These commands are essential for efficient version control on GitHub, aiding developers in tracking and controlling source code changes.
FAQs
What is Git init, and why is it the first command used in a new project?
The "git init" command serves as the initial step in establishing a fresh Git repository. It commonly serves as the inaugural action in a new project since it establishes version control, enabling developers to monitor alterations. Failure to initialize a repository results in the inaccessibility of many other Git commands.
How does Git pull differ from Git fetch and merge?
Git pull is a combination of Git fetch and merge. It extracts changes from a remote repository on GitHub and updates the local repository. Git fetch, on the other hand, downloads remote content but does not update the local repository, making it a more conservative option. Git merge integrates branches and creates a single unique branch, often used to merge two branches together.